
Homeowners should know these roofing terms: shingles (primary water-shedding layer), underlayment (secondary barrier), flashing (seals joints and penetrations), drip edge (protects eaves and directs runoff), ridge vent (exhaust ventilation), soffit (intake ventilation), fascia (board supporting gutters), valley (where roof planes meet), roof pitch (slope affecting materials and drainage), and ice and water shield (self-adhered membrane for leak-prone zones). Understanding materials, overlaps, nailing, ventilation balance, and code-driven ice-barrier placement helps prevent leaks, rot, and premature failure, with additional nuances improving decisions ahead.
Key Takeaways
- Shingles are overlapping roof coverings; look for proper nailing, alignment, and signs of wear like granule loss or lifted edges.
- Underlayment is the secondary water-shedding layer; choices include felt, synthetic, and self-adhered membranes based on climate and code.
- Flashing directs water away from joints and penetrations; must overlap shingle-style and integrate with underlayment to prevent leaks.
- Drip edge metal at eaves and rakes channels water into gutters and protects deck edges from capillary action and ice dams.
- Ridge vent and soffit work together for attic ventilation; ensure balanced intake and exhaust per required net-free vent area.
Shingles
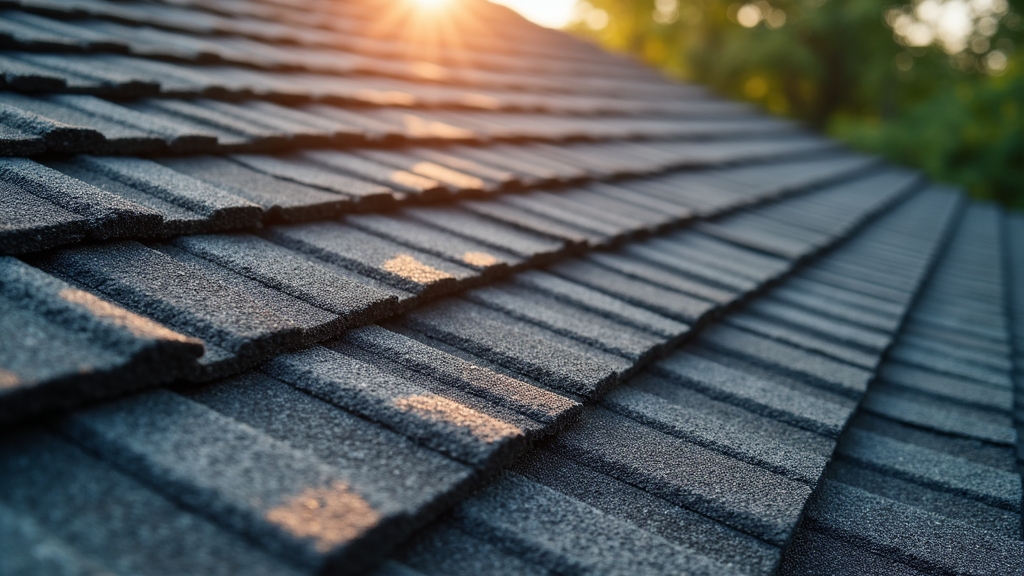
Shingles are the overlapping roof coverings that form the primary water-shedding layer on steep-slope roofs, typically manufactured from asphalt, wood, metal, slate, or composite materials. They are installed in courses, with specified exposure, headlap, and offset to control water flow and wind resistance.
Asphalt shingles are categorized by cut (three-tab, architectural/laminate) and rated for wind uplift, impact resistance, and fire classification. Wood shingles and shakes differ by thickness and split-sawn texture; slate is graded by thickness and nominal size; metal “shingles” use interlocking profiles and concealed fasteners.
Key performance factors include proper nailing patterns, fastener type and length, and alignment to manufacturer layout lines. Attention to starter courses, rake and eave edges, and valley shifts reduces capillary intrusion and wind-driven rain.
Correct nailing, fasteners, and precise layout—plus careful edges and valleys—prevent leaks and wind-driven intrusion.
Hip and ridge caps must match profile and warranty requirements. Ventilation and flashing integration affect service life. Routine inspections should identify granule loss, cupping, cracked tabs, displaced fasteners, and lifted edges.
Underlayment
Although concealed beneath the roof covering, underlayment is the secondary water-shedding and air barrier layer installed over the deck to manage liquid water, vapor diffusion, and temporary dry-in. It decouples shingles from the substrate, moderates moisture loads, and provides short-term weather protection before cladding is installed. Common categories include asphalt-saturated felt, synthetic polymer sheets, and self-adhered membranes. Selection hinges on climate, roof slope, deck type, and code requirements (e.g., ice-barrier zones).
| Consideration | Guidance |
| Material class | Felt for economy; synthetics for tensile strength and UV tolerance; self-adhered for critical zones and high-wind areas. |
| Perm rating | Choose lower perms for exterior insulation assemblies; higher perms for vented attics needing outward drying. |
| Temperature rating | Match service temperature to dark roofs and low-ventilation assemblies. |
| Fastening | Cap nails/staples per manufacturer; minimize penetrations and maintain proper spacing. |
| Laps/offsets | Follow printed lap lines; increase overlaps on low-slope planes and at ridges. |
Ensure substrate dryness, roll alignment, and continuous coverage; replace UV-degraded sections before roofing.
Flashing
Flashing is the impermeable barrier that directs water away from joints, penetrations, and connections, preventing capillary intrusion and leaks.
Common materials include galvanized steel, aluminum, copper, and PVC, selected for corrosion resistance and compatibility with adjacent metals.
Proper installation requires shingle-style overlaps, sealed fasteners, and integration with underlayment and cladding to create continuous drainage paths.
Purpose and Function
In every weather-exposed roof assembly, flashing serves as the primary barrier that redirects water away from vulnerable joints and penetrations. Its function is to interrupt capillary action, shed runoff, and manage wind-driven rain at roof-to-wall interfaces, valleys, chimneys, skylights, and vent penetrations.
Properly designed flashing integrates with the drainage plane so water is directed to the exterior, not into the substrate. Functionally, it creates a shingled water path, establishing positive laps and controlled discharge points.
It also accommodates thermal movement at intersections, maintaining watertight continuity where dissimilar components meet. Effective flashing reduces wetting cycles, limits freeze-thaw stress, and protects sheathing, framing, and interior finishes from moisture intrusion.
For assessment, one verifies continuous overlaps, correct slope for drainage, intact seal lines, and unobstructed egress paths.
Materials and Installation
Because performance hinges on both composition and detailing, material selection for roof flashing prioritizes corrosion resistance, formability, and compatibility with adjacent substrates.
Common metals include galvanized steel (economical, requires intact coatings), aluminum (lightweight, avoid direct contact with alkaline masonry), and copper (durable, compatible with slate/tile, higher cost).
Stainless steel suits coastal or acidic environments. Lead offers superior malleability but requires safe handling and isolation from dissimilar metals.
Butyl or EPDM flashings serve low-slope membranes when manufacturer-approved.
Installation centers on shingle-style water shedding, not sealant reliance.
Step flashing is interlaced with each shingle course at sidewalls; kick-out flashing diverts runoff at terminations.
Counterflashing is embedded or regletted into masonry. Valleys use W- or open-metal profiles.
Maintain minimum overlaps, hemmed edges, fasteners in the flange only, and isolate dissimilar metals.
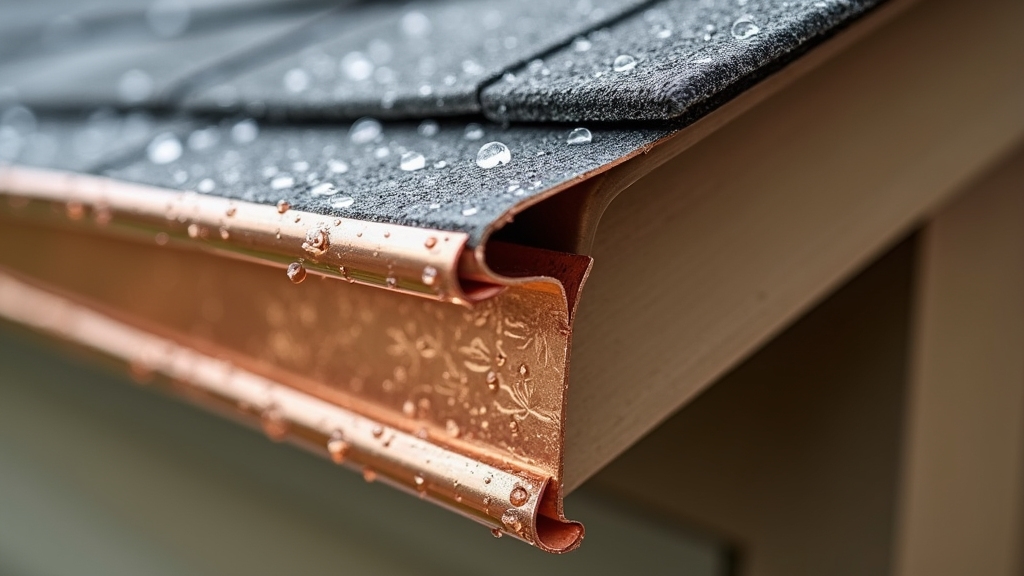
Drip Edge
A drip edge directs runoff into gutters and shields roof decking and fascia from capillary action and wind-driven rain.
Homeowners will encounter galvanized steel, aluminum, and PVC in “L” and “T” profiles, with hemmed edges preferred for stiffness and water control.
Correct installation places the drip edge under the underlayment at the rakes and over the underlayment at the eaves, with corrosion-resistant fasteners spaced per code and seams overlapped 2 inches minimum.
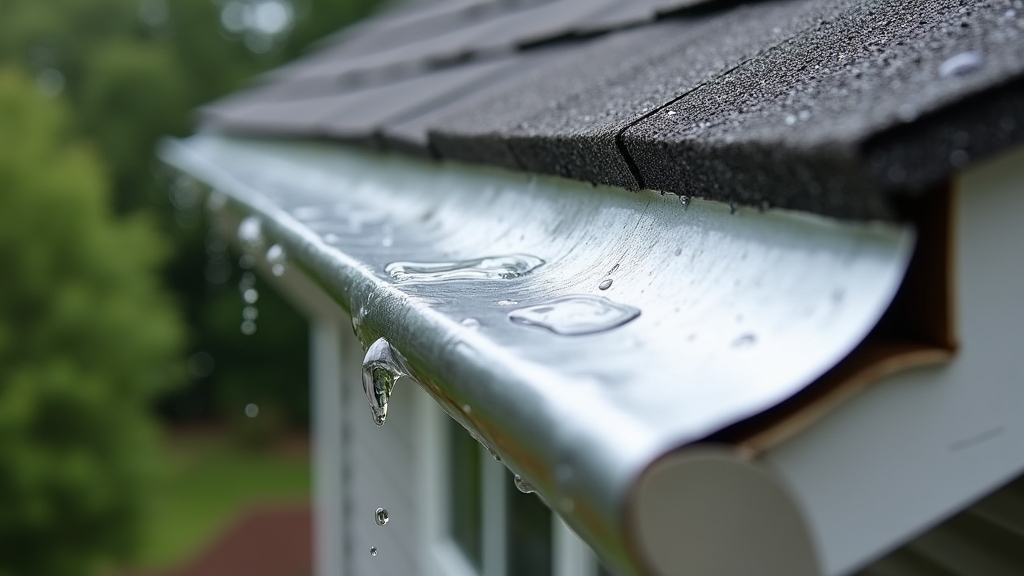
Purpose and Protection
Drip edge functions as a metal flashing installed along eaves and rakes to control water runoff, shield roof edges, and protect underlying components. Its primary purpose is to direct water into the gutters, preventing capillary action, wind-driven intrusion, and backflow under shingles.
Properly lapped and fastened, it limits fascia rot, soffit staining, and plywood delamination by keeping the roof deck dry at vulnerable margins.
Protection extends to ice dam scenarios: the drip edge, combined with underlayment, reduces meltwater intrusion at the eave line. It also stabilizes shingle edges, minimizing uplift from wind and preserving the shingle reveal.
Correct placement—under the underlayment at rakes and over the underlayment at eaves per prevailing codes—optimizes water shedding, enhances system durability, and safeguards warranty compliance.
Materials and Profiles
With function defined, material selection and profile geometry determine performance at the eaves and rakes.
Aluminum (typically 0.019–0.027 inch) offers corrosion resistance and formability; painted coil coatings add UV durability. Galvanized steel (26–24 gauge) provides rigidity; G90 zinc coating is preferred near salt or industrial exposure. Stainless steel excels in coastal zones. Copper delivers longevity and solderable seams but demands compatible fasteners to avoid galvanic action.
Common profiles include Type C (over-fascia drip with short flange), Type D “T-style” (extended lower leg projecting past fascia), and hemmed edges that stiffen and reduce shingle abrasion.
A 3/8–1/2 inch drip projection clears fascia; kick-out hems shed water away from trim. Compatibility with asphalt, slate, or metal panels and gutter interfaces should guide selection.
Installation Best Practices
Prioritize sequencing and fastening that manage water and wind.
For drip edge, install over the fascia along eaves first, beneath the underlayment, with a minimum 2-inch flange and 3/8-inch to 1/2-inch drip projection. At rakes, install over the underlayment to shed lateral water.
Lap joints 2 inches minimum, bed end laps in compatible sealant in coastal or high-wind zones. Fasten with corrosion-resistant roofing nails, spaced 8 to 10 inches on center, 1 inch from the edge, into sound decking—not fascia alone.
Align straight and flush; avoid “smiling” or gapping that wicks water. Extend past gutters to direct runoff into the trough; maintain uniform shingle overhang (1/4 to 3/8 inch).
Integrate with ice barrier in cold climates; terminate cleanly at valleys and step flashings.
Ridge Vent
A ridge vent is a continuous, low-profile ventilation component installed along the roof’s peak to exhaust warm, moist attic air. It functions by creating a uniform exhaust path at the highest point, leveraging stack effect and wind-induced negative pressure.
Quality ridge vents incorporate an external baffle to enhance airflow and an internal weather filter to block wind-driven rain, snow, and insect intrusion.
Proper installation requires a centered ridge slot cut to manufacturer-specified width, continuous vent coverage, and secure fasteners driven into the structural ridge. Cap shingles must be installed with correct exposure and nail placement to prevent uplift.
Net-free area (NFA) should be calculated to match required attic ventilation rates per code and manufacturer guidance, ensuring balanced intake-to-exhaust ratios.
Material choices include rigid shingle-over vents, metal ridge vents, and roll-style vents; selection should consider roof pitch, region, wind speed, and debris exposure.
Periodic inspection verifies attachment integrity, baffle condition, and unobstructed airflow.
Soffit
Soffit is the horizontal or sloped underside of roof eaves that encloses the rafter tails and often serves as the primary attic intake vent. It regulates airflow into the attic, balancing exhaust at the ridge to maintain neutral pressure and mitigate moisture accumulation and ice dam risk.
Materials include vented aluminum, vinyl, fiber cement, and wood, each with distinct permeability, fire ratings, and maintenance profiles. Proper net free ventilating area (NFVA) is critical; installers calculate intake to match or exceed exhaust.
- Continuous vented panels with perforations delivering targeted NFVA (e.g., 9–13 sq in/ft), backed by insect screen to prevent pest intrusion.
- Solid panels in unvented locations, preserving air barrier continuity while avoiding over-ventilation in conditioned assemblies.
- Substrate blocking and baffles at the top plate to prevent wind-washing of insulation and to maintain code-required ventilation channels.
- Corrosion-resistant fasteners and expansion-allowance detailing to accommodate thermal movement and prevent panel buckling.
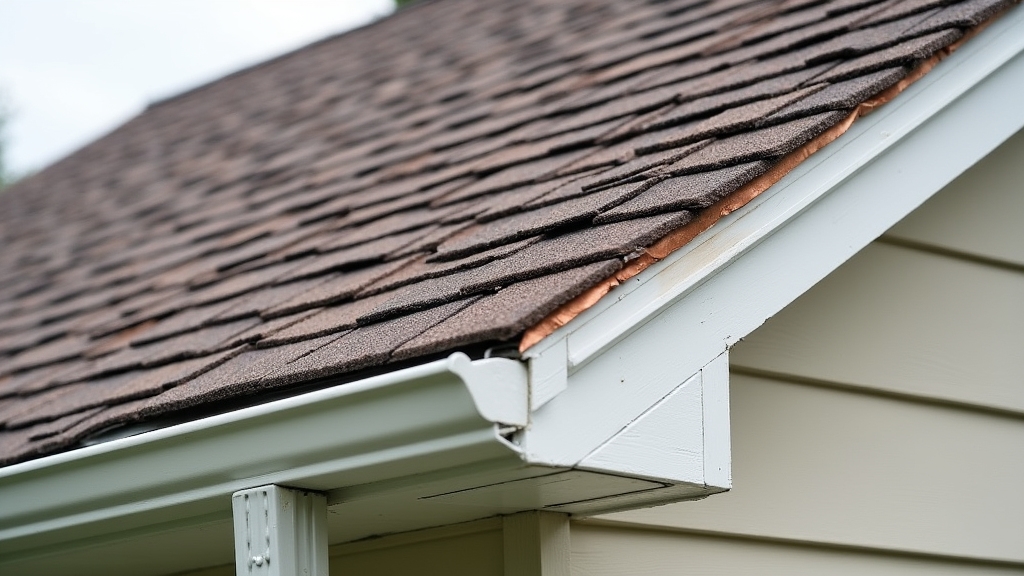
Fascia
Fascia is the vertical finishing board mounted to the ends of rafters or truss tails at the roof eave, forming the primary attachment substrate for gutters and the outer termination of the roof edge assembly. It provides a nailing base for drip edge and supports gutter loads under wind and hydraulic forces. Material selection—typically primed wood, PVC, or metal-wrapped—affects dimensional stability, decay resistance, and maintenance intervals.
Proper detailing includes continuous flashing behind the gutter, sealed end joints, and paint or cladding that resists UV and moisture. Fasteners should be corrosion-resistant and sized to penetrate framing, not just sheathing. Inspect for capillary staining, peeling coatings, and deflection under full gutters; address blocked downspouts promptly to prevent backflow damage. When replacing, verify plumb, straightness, and integration with soffit and rake trims.
| Aspect | Practitioner Notes |
| Material | PVC, metal-clad wood, or cedar for durability |
| Fastening | Stainless or hot-dip galvanized screws |
| Coatings | High-solids primer; elastomeric topcoat |
| Flashing | Continuous kick-out to gutter trough |
| Tolerances | Straightness within 1/8 inch over 10 feet |
Valley
A roof valley is the internal angle where two roof planes intersect, concentrating water flow and snowmelt toward gutters or drains.
Its performance depends on correct materials and flashing: open metal valleys (galvanized steel, aluminum, or copper), closed-cut shingle valleys, or woven shingle valleys, each with specified underlayment.
For durability, use corrosion-resistant valley metal of adequate gauge, install self-adhered ice-and-water shield beneath, and maintain proper shingle cutlines and fastener placement away from the valley centerline.
Purpose and Function
Although unobtrusive, a roof valley is the linear intersection where two roof planes meet, engineered to collect and channel runoff to gutters without infiltration or overflow. Its purpose is hydraulic control: concentrate flow, accelerate discharge, and prevent backflow at shingle laps and underlayment seams.
Functionally, it sets the drainage path of highest demand, so geometry, slope continuity, and clear flow lines are critical. Properly managed valleys reduce hydrostatic pressure, minimize ice-dam effects, and protect sheathing edges at the junction.
- Directs converging roof runoff into a predictable, centralized flow path to the eaves.
- Maintains positive slope and uninterrupted conveyance to avoid standing water and capillary intrusion.
- Coordinates with adjacent planes to balance tributary area and discharge rate.
- Provides a controlled expansion zone for high-volume events, limiting splashback and edge wicking.
Materials and Flashing
Building on the valley’s role as the primary drainage corridor, material selection and flashing configuration determine its durability and leak resistance. Valleys experience concentrated runoff and abrasive granule flow, so substrates and metals must be robust. Open valleys with exposed metal (minimum 24-gauge steel, aluminum, or copper) shed debris efficiently; closed-cut valleys rely on shingle overlays and demand meticulous underlayment continuity. Install self-adhered ice-and-water membrane centered in the valley, extending 18–24 inches each side. Hemmed edges, W-valley ribs, and slip sheets prevent capillary action and galvanic abrasion. Maintain fastener offsets 6 inches from the centerline.
| Valley Type | Material | Best Use |
| Open | Copper or coated steel | High snow/ice, complex roofs |
| Closed-cut | Shingles + membrane | Aesthetics priority |
| W-valley | Ribbed metal | Heavy rainfall zones |
| Woven | Shingle weave | Low-slope, uniform shingles |
Roof Pitch
Roof pitch defines the roof’s slope, expressed as rise over run (e.g., 6:12 indicates 6 inches of vertical rise for every 12 inches of horizontal run). It determines drainage rate, cladding suitability, structural loading, and safe work practices.
Pitch is often converted to degrees for design calculations: degrees = arctangent(rise/run). Steeper pitches shed water faster and resist ponding but increase wind uplift and material waste; low slopes demand enhanced underlayment and precise detailing at penetrations.
- 3:12 to 4:12 — borderline low-slope; requires sealed underlayment and manufacturer-approved shingles; careful valley geometry.
- 5:12 to 8:12 — conventional; broad shingle compatibility; balanced aesthetics, drainage, and walkability.
- 9:12 to 12:12 — steep-slope; superior shedding; necessitates harnessed access, additional fastening, and attention to hip/ridge ventilation.
- 1/4:12 to 2:12 — very low slope; use membranes or standing seam; calculate tapered insulation for positive drainage.
Builders verify pitch with a digital inclinometer or framing square; designers reference local snow, wind, and seismic loads when specifying rafters, truss profiles, and fasteners.
Ice and Water Shield
Steeper or low-slope conditions influence where self-adhered ice and water shield is required and how it performs. This membrane is a polymer-modified bitumen sheet with a peel-and-stick backing that seals around nails, forming a secondary waterproofing layer.
Building codes typically mandate its installation from the eave to at least 24 inches inside the warm wall in cold climates to mitigate ice dam intrusion. It is also specified at valleys, penetrations, roof-to-wall connections, and along low-slope eaves.
Selection hinges on temperature rating, UV exposure tolerance, and substrate compatibility. High-temperature products are essential beneath metal, dark shingles, or in hot climates.
For mechanically fastened roofs, a smooth-surfaced membrane aids shingle layup; for metal panels, slip-resistant yet high-temp variants reduce oil-canning and adhesive bleed.
Substrate must be clean, dry, and primed where required. Lap seams should follow manufacturer widths; roll with pressure for full bond.
Integrate with drip edge and underlayment per NRCA details.
Frequently Asked Questions
How Do I Choose a Reliable Roofing Contractor?
They should verify licensing, insurance (general liability, workers’ compensation), and manufacturer certifications; demand written scope, materials, and warranties; check recent local references; confirm permit handling; assess safety protocols; compare detailed bids; avoid large deposits; and require documented change-order procedures.
What Warranties Should I Expect on a New Roof?
They should expect manufacturer material warranties (limited lifetime or 25–50 years), contractor workmanship warranties (2–10+ years), transferable terms, prorated schedules, wind/hail coverage, algae protection, registration requirements, exclusion lists, and maintenance obligations. Verify enhanced-system coverage contingent on certified installer and full-component assemblies.
How Long Does a Roof Replacement Typically Take?
A full roof replacement typically takes 1–3 days. Duration varies by roof size, pitch, layer removal, decking repairs, material (asphalt, metal, tile), crew size, weather, and site logistics. Complex roofs or structural remediation can extend timelines considerably.
How Often Should a Roof Be Professionally Inspected?
Annually for asphalt or metal; biannually in severe climates; after hail, high winds, or leaks. He specifies spring/fall scheduling, attic checks, moisture mapping, flashing/penetration assessment, and documentation to maintain warranties and establish baseline condition, enabling predictive maintenance and timely remediation.
What Insurance Claims Steps Apply After Storm Roof Damage?
They should document damage, mitigate further loss, review policy, notify insurer promptly, file a claim, obtain contractor estimates, request adjuster inspection, accompany inspection, compare scope to estimates, negotiate discrepancies, authorize emergency repairs, preserve invoices, meet deadlines, and pursue appraisal or escalation if underpaid.
Final Thoughts
Knowing the language—shingles, underlayment, flashing, drip edge, ridge vent, soffit, fascia, valleys, roof pitch, and ice & water shield—gives you the power to spot issues early, evaluate bids apples-to-apples, and confirm code-compliant installation. Pair that vocabulary with routine inspections and you’ll prevent leaks, rot, and premature failures while extending your roof’s life.
If you want a pro to verify details like nailing patterns, lap overlaps, ventilation balance, and ice-barrier placement, bring in a local team that lives this every day. Premiere Roofing Macomb delivers thorough roof inspections, code-ready roof replacements, and durable residential roofing across all major materials—asphalt shingles, metal roofing, and composite roofing.
Ready to turn roofing terms into a roof that performs? Schedule your inspection or estimate today via our Contact Page or explore all services.
586) 496-4621 — Premiere Roofing Macomb: protecting homes and preserving value.